


Why Getting Your Window Measurements Right Saves You Time and Money
Knowing how to measure vinyl replacement windows correctly is the single most important step before ordering — get it wrong and you’re looking at weeks of delays and hundreds of dollars in reorder costs.
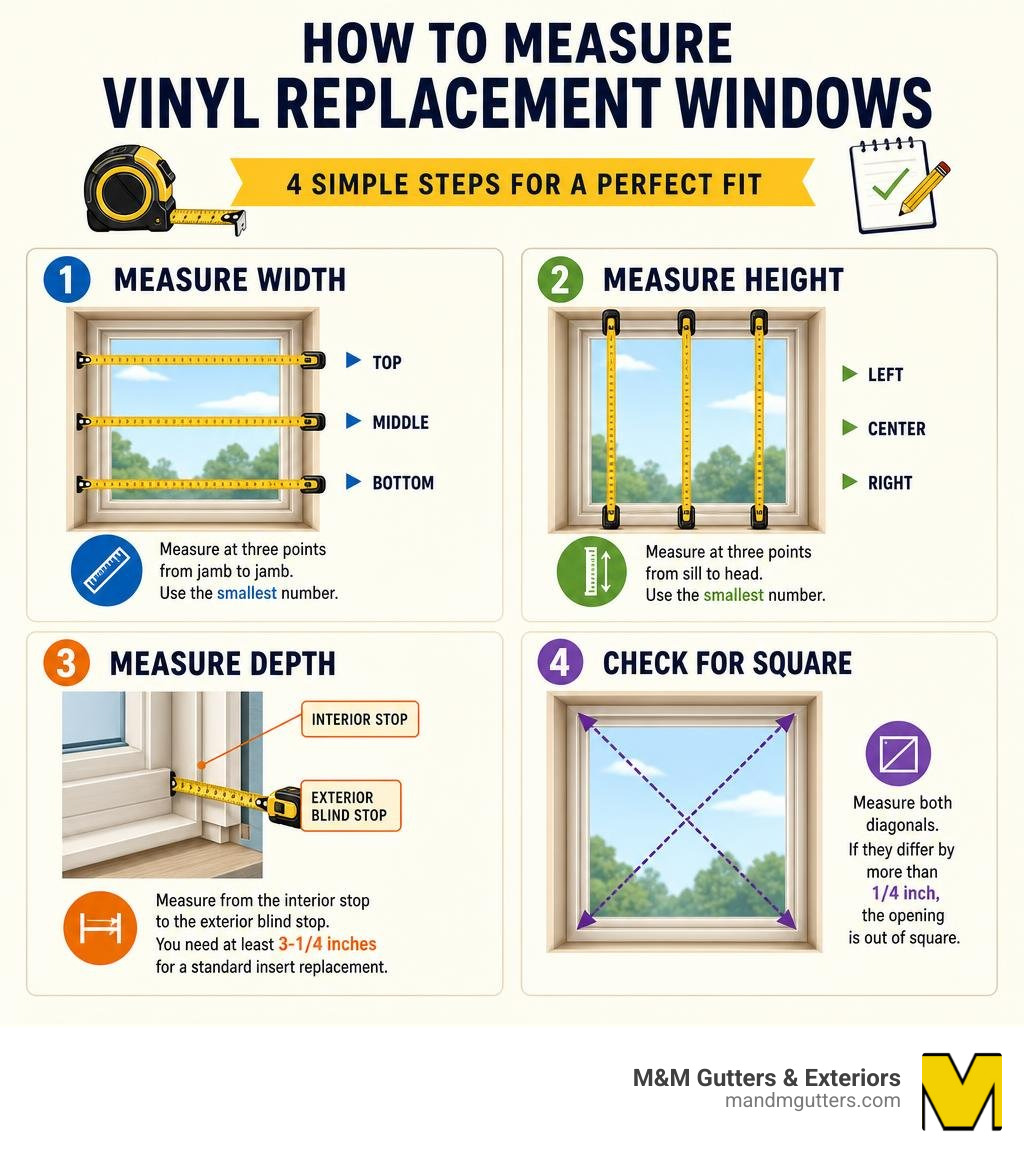
Here’s how to measure vinyl replacement windows in 4 steps:
- Measure the width at three points (top, middle, bottom) from jamb to jamb — use the smallest number
- Measure the height at three points (left, center, right) from sill to head — use the smallest number
- Measure the depth from the interior stop to the exterior blind stop — you need at least 3-1/4 inches for a standard insert replacement
- Check for square by measuring both diagonals — if they differ by more than 1/4 inch, the opening is out of square
Those four steps apply to most standard vinyl window replacements. The details — tools, tolerances, special window types, and common mistakes — are what the rest of this guide covers.
With replacement windows averaging $477 per window in 2026 (and full-house projects reaching $7,354 or more), a simple measurement error can turn a smooth project into an expensive headache. Custom windows can’t be returned. That’s not a small risk.
I’m Nathan Nuttall from M&M Gutters & Exteriors, and after more than 30 years serving Utah homeowners I’ve seen how knowing how to measure vinyl replacement windows correctly separates a stress-free installation from a costly do-over. This guide walks you through everything you need to get it right the first time.
How to measure vinyl replacement windows terminology:
- how do you measure a replacement window
- how to measure for replacement windows in a brick home
- how to measure for replacement window screens
Understanding Window Anatomy and Sizing Decisions
Before you pull out your tape measure, we need to speak the same language as the manufacturers. If you order a window and tell the supplier you measured “from the wooden part to the other wooden part,” you might end up with a very expensive piece of glass that only fits your garage floor.
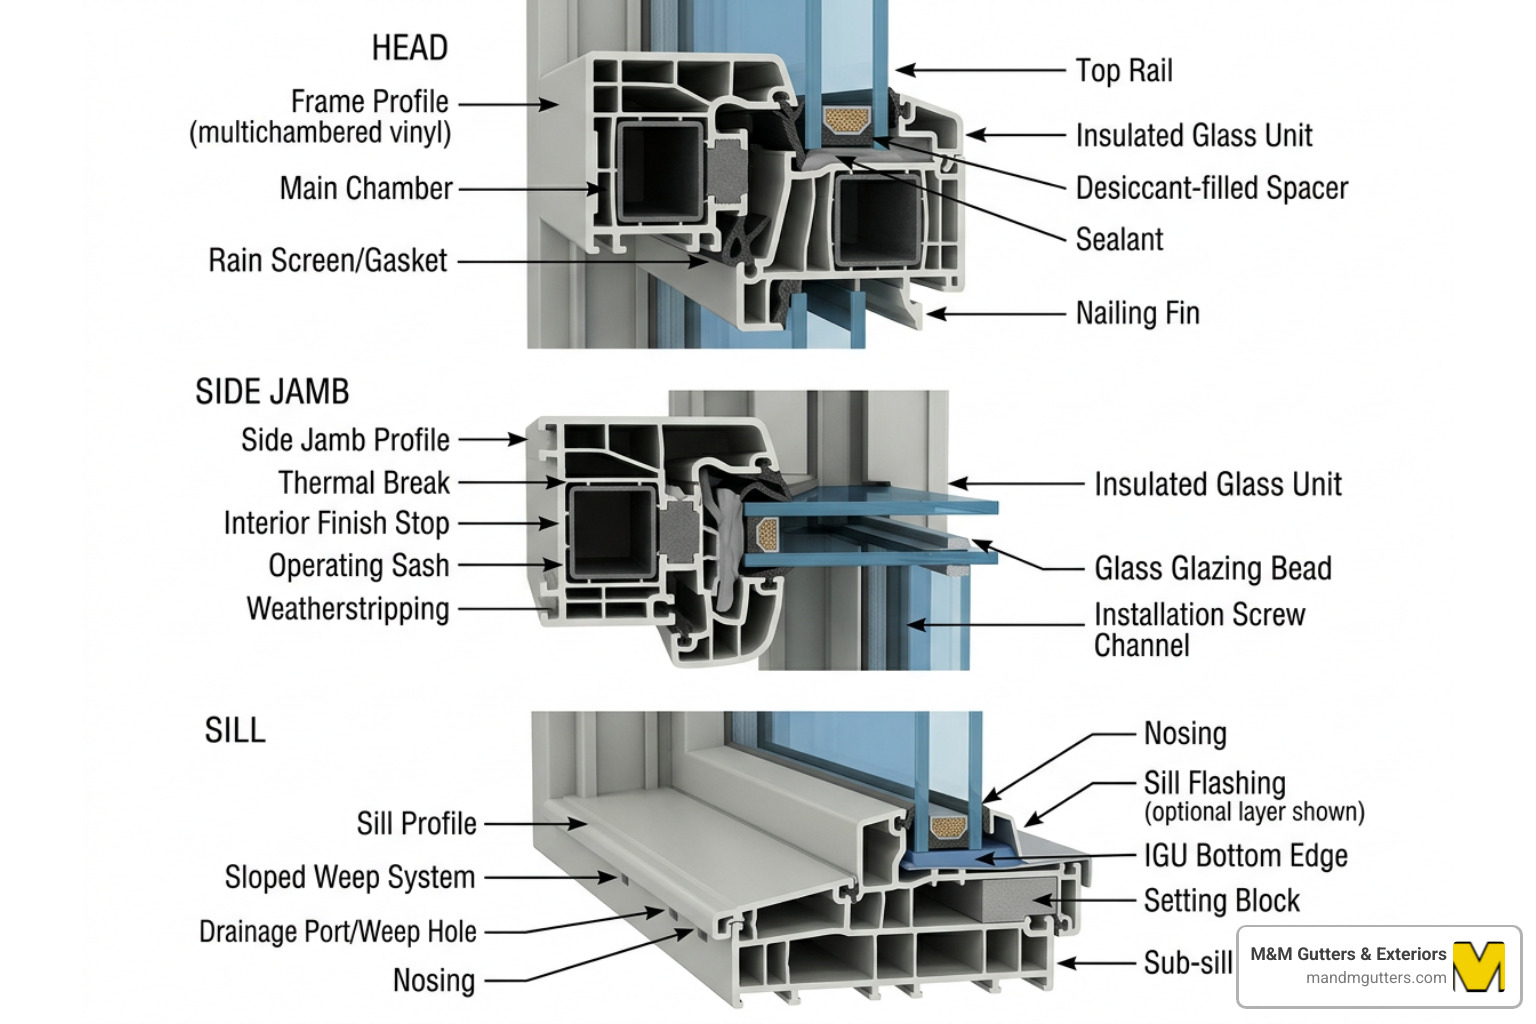
Let’s break down the basic anatomy of a window frame. Every standard window opening consists of three main components:
- The Head: This is the horizontal piece that forms the very top of the window frame.
- The Jambs: These are the vertical sides of the frame. You have a left jamb and a right jamb.
- The Sill: This is the horizontal piece at the bottom. It typically slopes downward on the exterior to shed water away from your home.
When you are replacing windows, you also have to make a crucial decision: are you doing a pocket installation (also known as an insert replacement) or a full-frame installation?
In a pocket installation, the existing window sashes are removed, but the original wooden frame (the head, jambs, and sill) remains intact. The new vinyl replacement window is “inserted” directly into this existing pocket. This is highly popular because it preserves your interior trim and exterior siding, making the process much faster and less invasive. However, it only works if your existing frame is structurally sound, free of rot, and reasonably square. You can read more about these structural considerations in our guide on How to Measure Windows for Replacement: Get It Right the First Time.
A full-frame installation, on the other hand, involves tearing out everything — sashes, frame, sill, and exterior trim — down to the raw studs, exposing what is known as the rough opening. This is necessary if your old frames are rotting, water-damaged, or severely out of square. Measuring for a full-frame replacement requires exposing the studs or making educated calculations by removing some trim.
Why Accuracy Matters When Learning How to Measure Vinyl Replacement Windows
When dealing with vinyl windows, precision is everything. Standard vinyl units are manufactured with a tiny bit of built-in clearance (often 1/4 inch to 1/2 inch smaller than your recorded opening dimensions) to allow room for leveling, shimming, and insulating.
For standard replacement units, your measurements must be accurate within a 1/4 inch tolerance. However, if you are ordering impact-resistant windows, heavy-duty double-pane units, or custom-shaped designs, that margin shrinks to a razor-thin 1/16 inch tolerance.
If a window is ordered even a fraction of an inch too large, it simply will not fit into the opening. Forcing it can bow the vinyl frame, which ruins the weather seals, cracks the glass, and voids your warranty. Conversely, if it is too small, you will have massive gaps that require excessive shimming and foam, compromising the window’s energy efficiency and structural integrity. For deeper insights into these structural tolerances, check out the How to Measure for Replacement Windows – Family Handyman guide.
Essential Tools and Materials
Do not try to measure your windows with a cloth sewing tape, a plastic ruler, or by “eyeballing” it. Soft measuring tapes stretch over time, which can easily throw your measurements off by a quarter of an inch or more.
Before starting, gather these essential tools:
- A high-quality steel tape measure: A 25-foot tape with a lock is ideal. Ensure the hook at the end is secure but has its normal slight play (which accounts for inside vs. outside measurements).
- A reliable level: A 2-foot or 4-foot level is perfect for checking if your head, sill, and jambs are level and plumb.
- A notepad and pencil: To write down every dimension immediately. Do not rely on your memory!
- A helper: While you can do this alone, having a friend hold the other end of the tape measure on large openings ensures the tape remains perfectly straight and doesn’t sag.
Inside vs. Outside Measurements
One of the most common questions we hear is whether to measure from the interior or the exterior. For standard vinyl pocket replacements, always measure from the inside of the home.
Measuring from the inside gives you direct access to the actual frame opening where the new window will sit. If you measure from the outside, your tape measure will likely get blocked by exterior casing, brick mold, or siding, leading to highly inaccurate numbers.
When measuring from the inside, you are measuring between the inner faces of the jambs, from the top of the sill to the head. You must measure past the interior stop (the trim piece that holds the sash in place) to the actual frame. For more details on navigating these trim layers, see How to Measure for Replacement Windows – This Old House.
Step-by-Step Guide: How to Measure Vinyl Replacement Windows
Now that you have your tools ready and understand the anatomy of your opening, let’s dive into the physical measurement process. Remember our golden rule: measure three times, record each, and use the smallest value.
Older homes settle over time. A window frame that looks perfectly rectangular is almost certainly skewed by a fraction of an inch from one side to the other. By taking three measurements for both width and height, you ensure the new window will fit through the tightest point of the opening. For a closer look at this sizing philosophy, read Measure Twice, Order Once: Your Guide to Perfect Replacement Window Sizing.
Measuring the Width
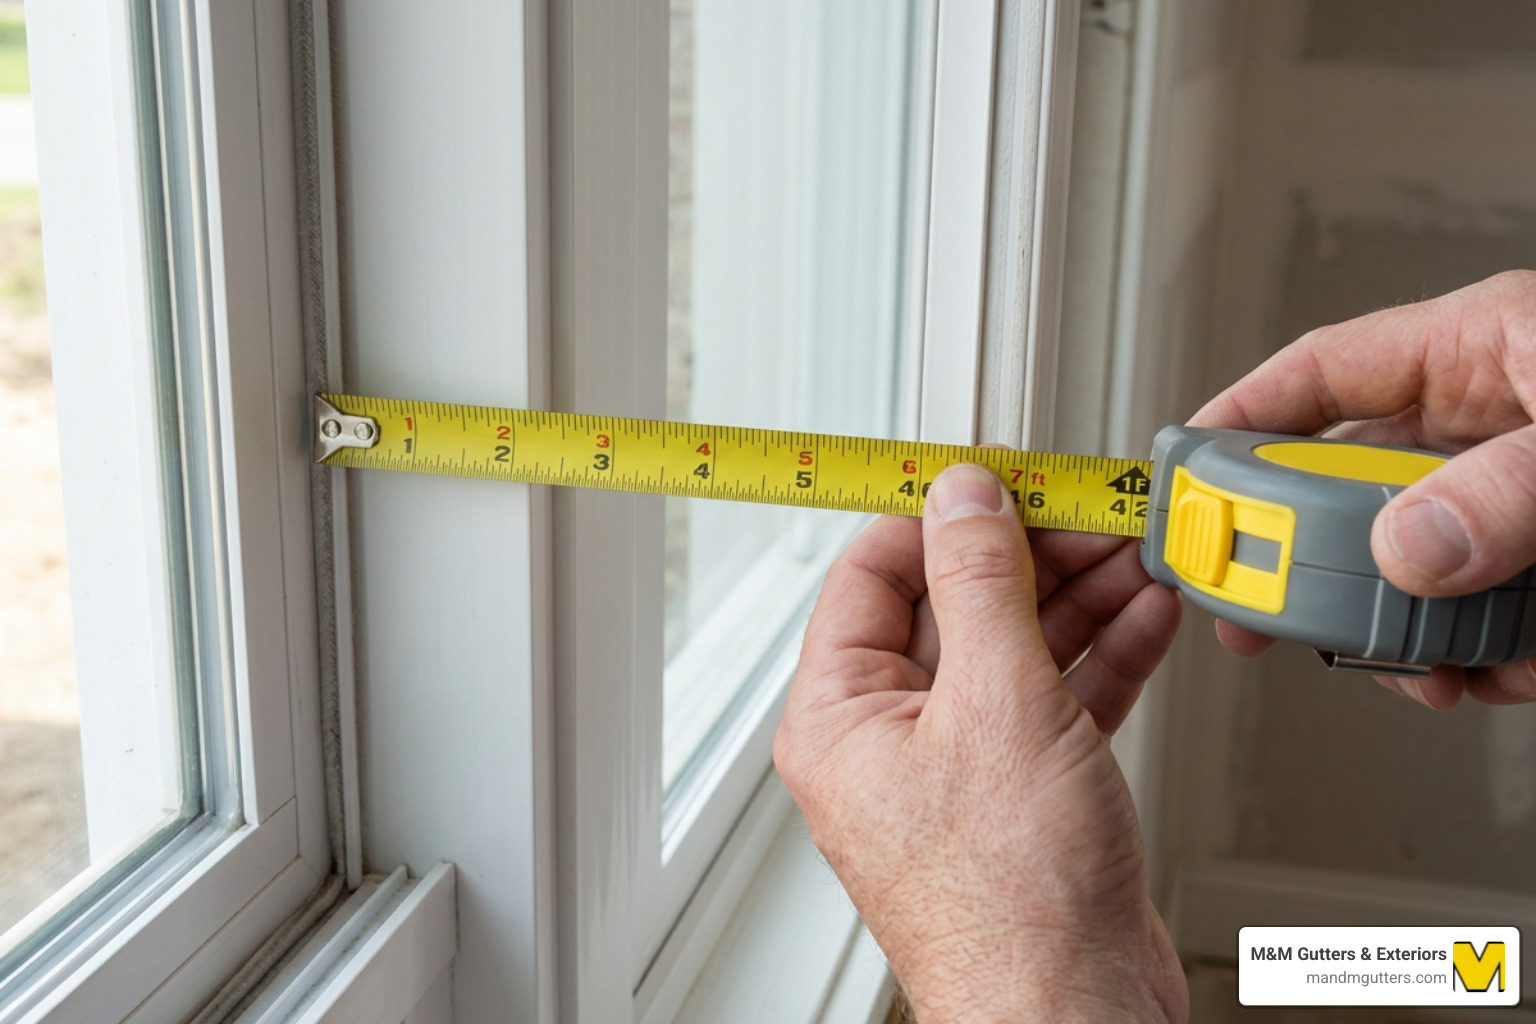
To find the correct width for a pocket replacement window, you need to measure the horizontal distance between the inside faces of the vertical jambs.
- Bottom: Place your tape measure against the left jamb at the bottom of the window (just above the sill) and stretch it to the right jamb. Record the number.
- Middle: Move up to the middle of the window and measure horizontal jamb-to-jamb distance. Record the number.
- Top: Move to the very top of the window (just below the head) and measure jamb-to-jamb. Record the number.
- Determine the final width: Compare the three numbers. Circle the smallest of these three measurements. This is your ordering width.
Note: Do not measure from the trim or the parting strips. Your tape measure must touch the actual wooden or vinyl surface of the side jambs.
Measuring the Height
Next, you will find the vertical height. This is the distance from the high point of the sill to the lowest point of the head frame at the top.
- Left: Place your tape measure at the far-left side of the window. Measure from the high point of the sill (the part closest to the inside sash, not the sloped exterior stool) up to the head jamb at the top. Record the number.
- Center: Move to the exact middle of the window and measure vertically from sill to head. Record the number.
- Right: Move to the far-right side and repeat the measurement. Record the number.
- Determine the final height: Compare your three vertical numbers. Circle the smallest of these three measurements. This is your ordering height.
Measuring the Depth
Many homeowners skip measuring the depth, only to find out their new vinyl windows stick out past their interior drywall. Vinyl replacement windows have a standard frame depth (typically around 3-1/4 inches). Your existing window opening must have enough depth to accommodate this new frame.
To measure the depth:
- Open the lower window sash.
- Place your tape measure against the inside face of the exterior blind stop (the wood or vinyl strip that acts as a barrier for the sash on the outside).
- Extend the tape to the interior stop strip (the trim closest to the inside of your room).
- Measure this pocket depth at several points along the head and jambs.
You need at least 3-1/4 inches of clear depth between these two stops for a standard vinyl pocket window to fit.
| Installation Type | Minimum Depth Required | Key Measurement Focus |
|---|---|---|
| Pocket (Insert) Install | 3-1/4 inches | Distance between interior stop and exterior blind stop |
| Full-Frame Install | Variable (typically 4-9/16″ studs) | Raw stud-to-stud depth of the rough opening |
Checking for Squareness
A window opening can have the correct width and height but still be shaped like a slanted parallelogram instead of a perfect rectangle. If the opening is severely out of square, a square vinyl window will not fit.
To check for squareness:
- Place your tape measure in the top-left corner of the window frame where the head and jamb meet.
- Stretch the tape diagonally to the bottom-right corner where the sill and jamb meet. Record this number.
- Place your tape in the top-right corner and stretch it diagonally to the bottom-left corner. Record this number.
Compare the two diagonal measurements:
- If the difference between the two diagonals is 1/4 inch or less, your window frame is square enough for standard installation.
- If the difference is between 1/4 inch and 1/2 inch, you will need to adjust your ordering size. Usually, you should deduct an extra 1/8 to 1/4 inch from your smallest width and height measurements to allow room to tilt and shim the window into square.
- If the difference exceeds 1/2 inch, the opening is severely out of square. You should consult a professional, as a full-frame replacement or structural framing adjustments will likely be required.
Measuring Special Window Types
While the three-point measurement system works beautifully for standard double-hung or single-hung windows, other architectural styles require a slightly modified approach. Choosing the right style is key to maximizing performance and curb appeal, which we detail in our guide on the Best Windows for Your Utah Home.
How to Measure Vinyl Replacement Windows by Style
- Double-Hung and Single-Hung Windows: These are the most common windows in Northern Utah homes. Follow the standard three-point width and height process. However, pay special attention to the sloped sill. Always measure from the highest point of the wooden sill inside, not from the bottom of the sloped exterior sill. For a highly detailed breakdown of this style, see The Double-Hung Window Measurement Handbook: No More Guesswork.
- Casement Windows: Casement windows crank outward to open. When measuring casements, you measure the inside jamb-to-jamb width and head-to-sill height just like double-hungs. However, check the hinge clearance on the exterior. Ensure there are no structural obstructions (like deep brick trim or downspouts) that will block the window from cranking fully open.
- Bay and Bow Windows: Bay and bow windows project outward from your home’s exterior wall. Measuring these is a complex task because they consist of multiple individual window units joined at angles (usually 30, 45, or 90 degrees). You must measure each individual panel separately from the inside of the home, recording the width of the center picture window and the flanking side windows. You must also measure the angle of the projection to ensure the new vinyl unit matches the existing roof overhang and support platform. Learn more about capturing these tricky angles in our guide on Curvy Windows: Perfect Fit Measuring for Bay and Bow Replacements.
Avoiding Common Mistakes and Organizing Your Data
Even experienced DIYers can make simple record-keeping errors that ruin an entire order. Here are the most common window measurement mistakes and how to avoid them:
- Measuring the glass instead of the frame: This is the number one mistake. Homeowners stretch their tape measure across the visible glass pane. A window ordered to glass-size will be several inches too small! Always measure to the inside edges of the frame.
- Rounding up your measurements: In carpentry, we often round to the nearest whole number. For windows, never round up. If a measurement is 35-5/8 inches, do not round it to 36 inches. If you must round, round down to the nearest 1/8 inch.
- Assuming identical windows are actually identical: Just because the three windows in your living room look exactly the same does not mean they are. House settling, framing variances, and drywall thickness can cause adjacent windows to differ by 1/4 inch or more. Measure every single window independently.
- Mixing up width and height: Window manufacturers always list dimensions as Width x Height (W x H). If you write down “36 x 48” but the window is actually 48 inches wide and 36 inches tall, you will receive a window turned sideways. Always label your numbers clearly.
To keep your project organized, we recommend creating a simple tracking sheet like the one below. Label each window by its room and orientation (e.g., “Kitchen – North Wall”) so there is no confusion when your new vinyl windows arrive. For more tips on organizing your home improvement measurements, check out A Step-by-Step Guide to Measuring Windows – Bob Vila.
Sample Window Measurement Log
| Room & Location | Width 1 (Top) | Width 2 (Mid) | Width 3 (Bot) | Height 1 (Left) | Height 2 (Ctr) | Height 3 (Rt) | Diagonals (A / B) | Final Ordered Size (W x H) |
|---|---|---|---|---|---|---|---|---|
| Living Room – West | 35-7/8″ | 35-3/4″ | 35-7/8″ | 59-1/2″ | 59-3/8″ | 59-1/2″ | 68-1/2″ / 68-1/2″ | 35-3/4″ x 59-3/8″ |
| Master Bed – South | 47-1/4″ | 47-1/8″ | 47-1/4″ | 35-7/8″ | 36-0″ | 35-7/8″ | 59-1/4″ / 59-3/8″ | 47-1/8″ x 35-7/8″ |
Frequently Asked Questions About Sizing Windows
Should I measure my windows from the inside or the outside?
For vinyl replacement (pocket) windows, you should always measure from the inside of your home. This gives you direct access to the actual window frame jambs, head, and sill where the replacement window will sit. Exterior measurements are often blocked by siding, brick mold, or decorative trim, which can lead to ordering windows that are too large.
What is the minimum depth required for a standard vinyl insert replacement?
A standard vinyl pocket replacement window requires a minimum depth of 3-1/4 inches of clear space between your interior window stop and the exterior blind stop. If your frame’s depth is less than this, a pocket window will protrude past your interior wall, meaning you will need to perform a full-frame replacement instead.
What should I do if my window opening is out of square?
If your diagonal measurements differ by more than 1/4 inch but less than 1/2 inch, you can still install a standard vinyl window by deducting an extra 1/8 to 1/4 inch from your smallest width and height measurements. This extra space gives you room to tilt, plumb, and shim the new window into a perfectly square position within the skewed opening. If the diagonals differ by more than 1/2 inch, you should contact a professional to assess the structural framing.
Conclusion
Measuring your windows is the critical foundation of any successful home remodeling project. Taking the time to measure three times, check for squareness, and verify your depths will save you from the major headache of custom-order errors.
While taking initial measurements is a fantastic way to get an accurate estimate for your project, finalizing those numbers can still feel intimidating. If you live in Salt Lake City, Salt Lake County, Utah County, Davis County, Weber County, Tooele County, or Summit County, you don’t have to tackle this alone.
At M&M Gutters & Exteriors, we bring over 30 years of local experience to your home. We handle the entire process from precise professional measurements to flawless installation. Plus, we use advanced HOVER 3D visualization technology so you can see exactly how your new vinyl windows will look on your home before we ever place the order.
Ready to upgrade your home’s comfort, beauty, and energy efficiency? Check out our window replacement services and schedule your free in-home consultation today!