


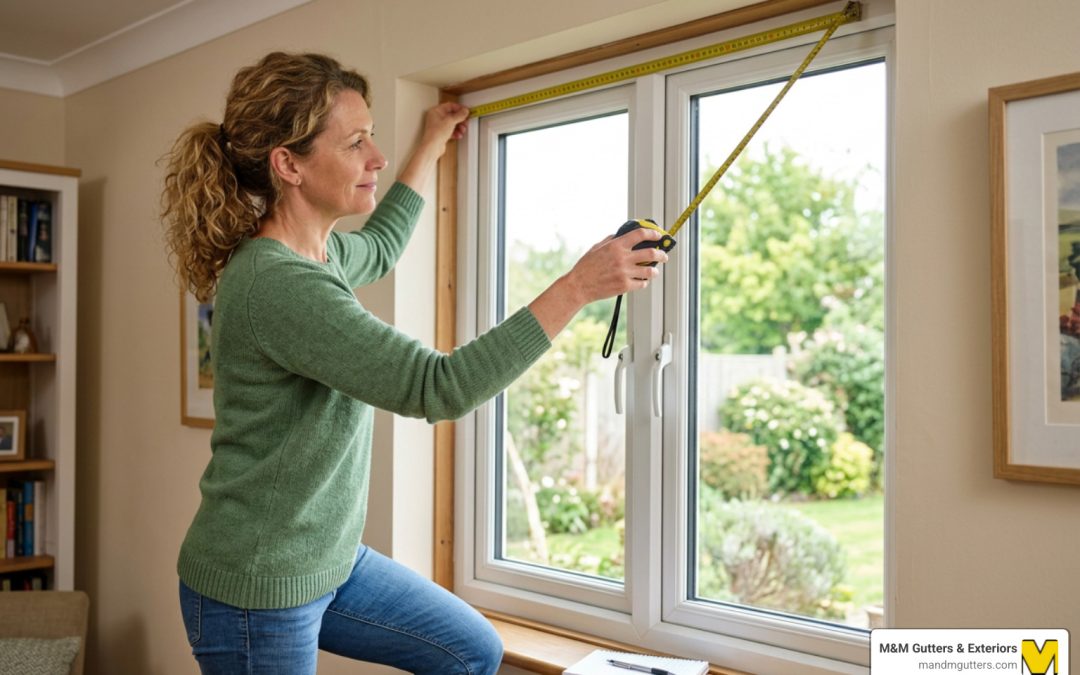
Why Getting Your Window Measurements Right Saves You Time and Money
Knowing how to measure a windows for replacement correctly is the difference between a smooth installation and a costly do-over. Even being off by a quarter inch can cause drafts, water leaks, and extra labor costs.
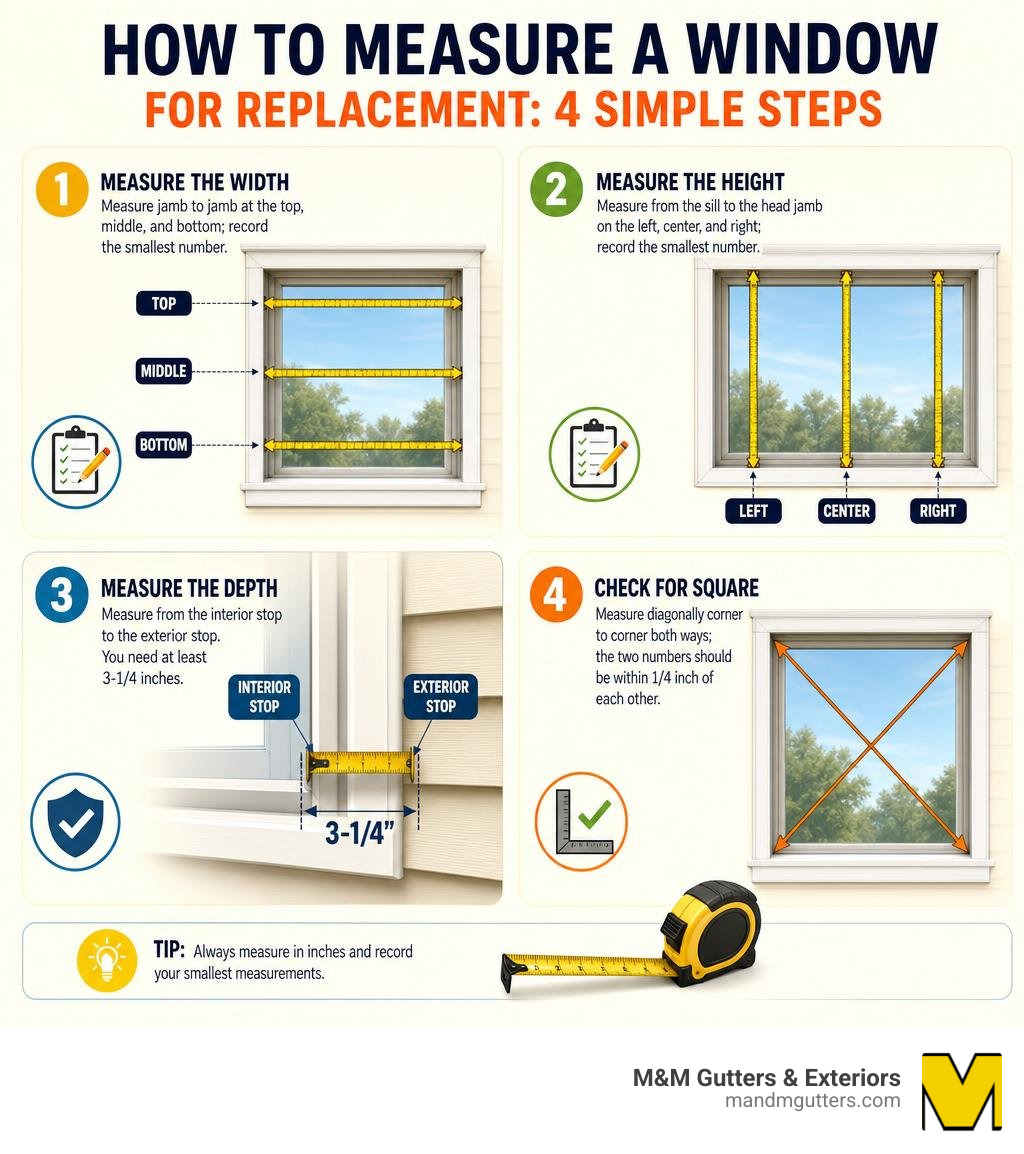
Here’s how to measure a window for replacement in 4 steps:
- Measure the width — measure jamb to jamb at the top, middle, and bottom; record the smallest number
- Measure the height — measure from the sill to the head jamb on the left, center, and right; record the smallest number
- Measure the depth — measure from the interior stop to the exterior stop; you need at least 3-1/4 inches
- Check for square — measure diagonally corner to corner both ways; the two numbers should be within 1/4 inch of each other
Windows account for 25–30% of your home’s heating and cooling energy loss according to the U.S. Department of Energy, so a poor fit doesn’t just look bad — it hits your utility bill every month.
I’m Nathan Nuttall from M&M Gutters & Exteriors, and after more than 30 years helping Utah homeowners with exterior improvements — including window replacement — I’ve seen how a simple measurement mistake can derail an entire project. In this guide, I’ll walk you through exactly how to measure a windows for replacement so you can get it right the first time.
Related content about how to measure a windows for replacement:
- how do you measure a replacement window
- how to measure for replacement windows in a brick home
- how to measure window screen replacement
Understanding Window Anatomy and Why It Matters
Before you pull out your tape measure, we need to speak the same language as the manufacturers. If you order a window based on the size of the glass or the decorative trim surrounding it, you are going to end up with a very expensive piece of glass that doesn’t fit your wall.
Every window opening is made up of a few key components that form the outer frame:
- The Head: This is the top, horizontal component of the window frame.
- The Jambs: These are the vertical sides of the window frame. You have a left jamb and a right jamb.
- The Sill: This is the bottom, horizontal component of the frame. It usually has a sloped profile to allow water to run off toward the exterior.
- The Stops: These are the small, raised strips of wood or vinyl on the inside and outside of the frame that keep the window sashes securely in place.
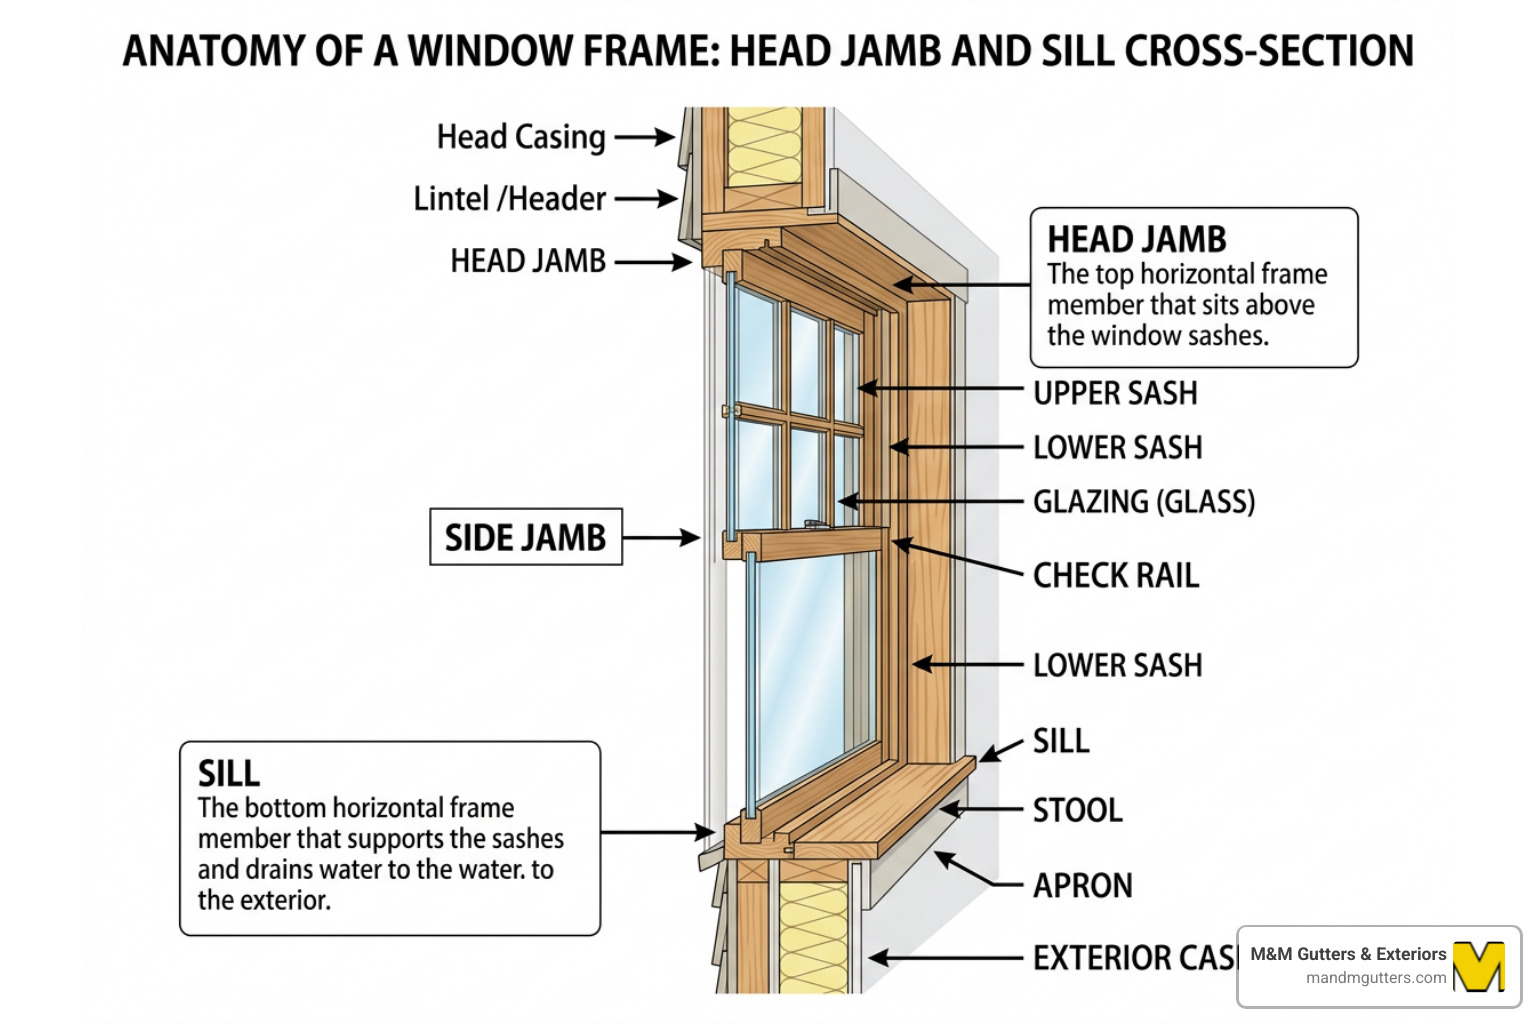
Understanding these parts is crucial because when we measure for a standard pocket or “insert” replacement window, we are measuring the pocket inside these frame components.
To get started, you will need a few basic tools:
- A heavy-duty metal tape measure (avoid fabric ones, as they stretch and sag).
- A reliable level (the longer, the better, for checking plumb and level).
- A notepad and pencil (or a smartphone tracking sheet) to record measurements immediately.
- A step stool or ladder for hard-to-reach windows.
If your existing frames are showing serious signs of wear, you might need to determine if you can use insert replacements or if you need a full-frame replacement. Check out our guide on 11 Signs You Need New Windows for Your Home to assess the health of your current windows before proceeding.
How to Measure a Windows for Replacement: The Step-by-Step Guide
When measuring for replacement windows, we use the three-point measurement method. Because houses naturally settle over time—especially along the Wasatch Front where temperature swings and shifting soil are common—window openings are rarely perfect rectangles. Measuring in three different spots for both width and height ensures we catch any bowing or sagging in the frame.
It is also vital to understand the difference between a rough opening and a finished opening:
- The rough opening refers to the structural framing (the raw wood studs) behind your drywall and exterior siding. This is what we measure for new-construction windows.
- The finished opening is the inside of the existing, fully trimmed window frame. For standard insert replacements, we measure the finished opening because the new window is designed to slide directly into the existing frame.
To make sure your new windows slide in smoothly without getting stuck, we always use the smallest measurement of the three points we test. For a detailed overview of this process, you can read our comprehensive How to Measure Replacement Windows Guide.
Step 1: Measuring the Width of Your Window Opening
To measure the width, you will measure horizontally between the inside faces of the side jambs.
- Extend your tape measure from the surface of the left jamb to the surface of the right jamb. Do not measure from the trim, casing, or the window sash itself—measure jamb-to-jamb.
- Take this horizontal measurement at three distinct locations:
- Top: Near the head jamb.
- Middle: Right across the center of the window.
- Bottom: Just above the window sill.
- Record all three numbers on your notepad.
- Circle the smallest width of the three. This is the official width measurement you will use when requesting quotes or ordering.
For more tips on achieving millimeter-perfect width dimensions, refer to our guide on Measuring Up: How to Get Perfect Window Dimensions Every Time.
Step 2: Measuring the Height of Your Window Opening
Next, we measure the vertical height of the window opening from the sill to the head.
- Place the hook of your tape measure on the high point of the sill (the part closest to the inside of the house, not the sloped exterior portion).
- Extend the tape straight up to the bottom of the head jamb.
- Take this vertical measurement at three locations:
- Left side
- Center
- Right side
- Record all three measurements.
- Circle the smallest height. Using the smallest height prevents you from ordering a window that is too tall to fit into a slightly sagged opening.
If you are measuring classic double-hung styles, we have tailored advice in The Double-Hung Window Measurement Handbook: No More Guesswork.
Step 3: Measuring the Depth of Your Window Frame
While many homeowners remember width and height, frame depth is frequently overlooked—yet it is absolutely critical. If your wall cavity or existing frame is too shallow, your new replacement window will protrude awkwardly into your living space or stick out past your exterior siding.
To measure the depth:
- Open your window sash so you have a clear path through the frame.
- Measure the distance from the inside face of the interior stop (the trim piece that holds the sash in place on the inside) to the inside face of the exterior stop (the barrier on the outside).
- Check this depth in multiple spots along the head and jambs.
To ensure a proper fit for a standard replacement window, there must be at least 3-1/4 inches of clear depth between the interior and exterior stops. If your frame has less than this, or if you are planning to install thicker triple-pane units for maximum insulation against Utah’s winter cold, you may need to plan for a full-frame replacement instead. Learn more about depth requirements in our How to Measure Replacement Windows Guide.
Checking for Square, Level, and Plumb
Just because a window frame has a consistent width and height doesn’t mean it is a perfect rectangle. If the frame has shifted into a parallelogram—a condition known as being “racked”—a new, perfectly square window will not fit.
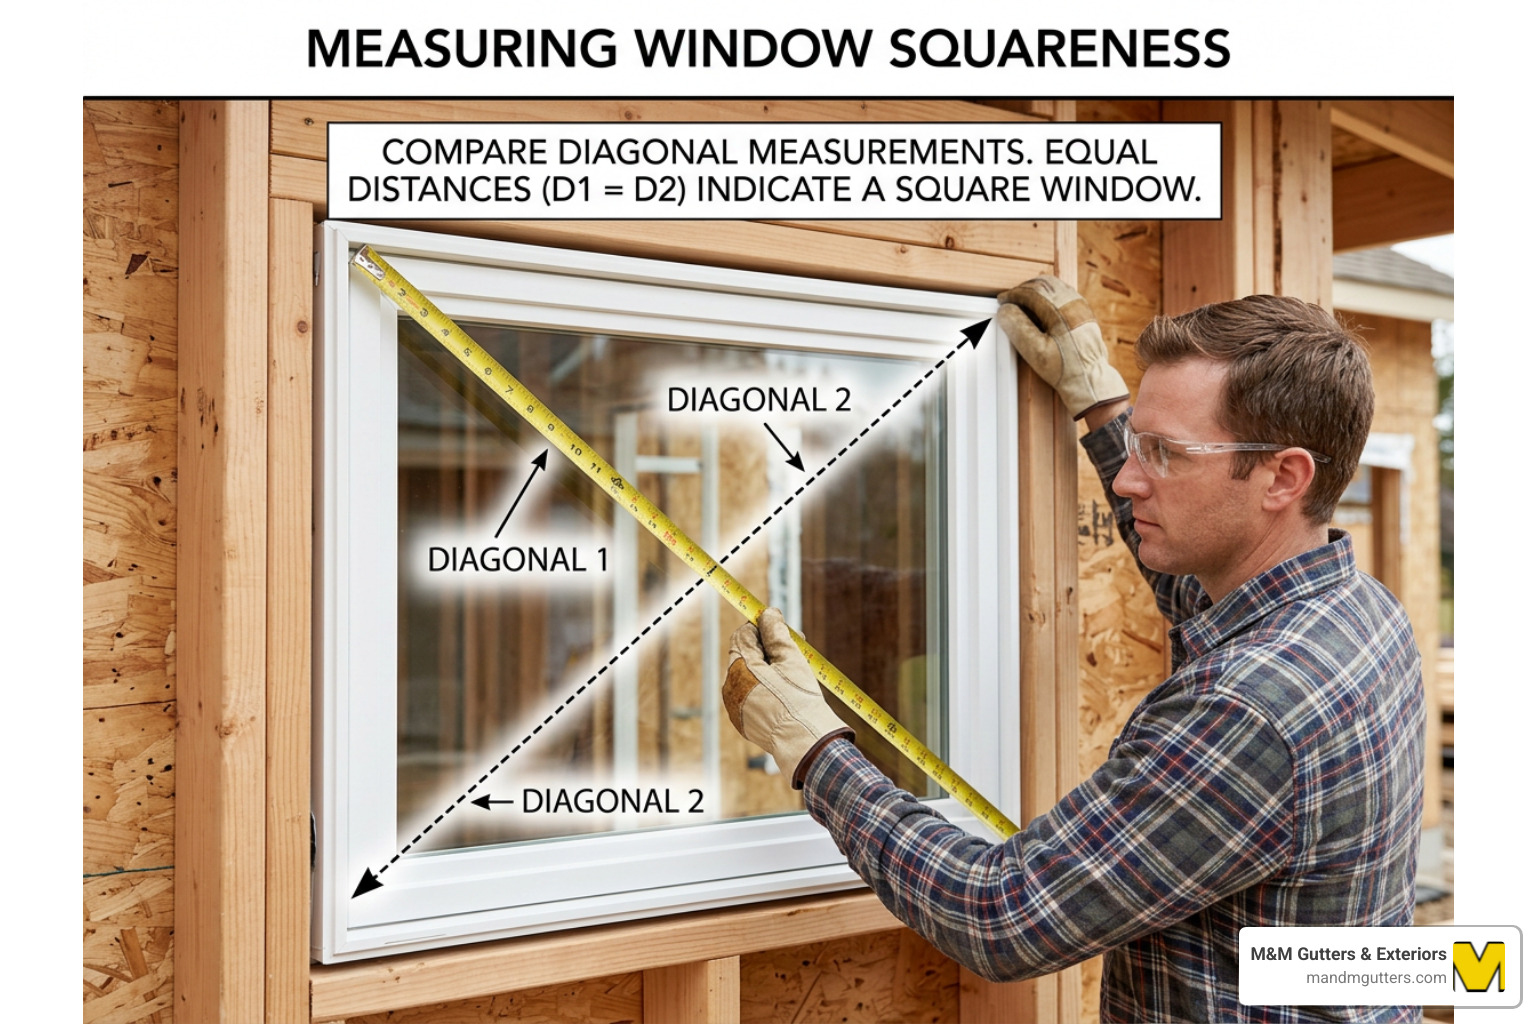
Here is how to check the alignment of your opening:
- Square: Measure diagonally from the top-left corner of the frame to the bottom-right corner. Then, measure from the top-right corner to the bottom-left corner. Compare the two numbers.
- Standard replacement windows will typically allow for diagonal measurements to be different by up to 1/4 inch.
- If the diagonal measurements differ by more than 1/4 inch, your frame is out of square. If the difference is significant, you may need to note an adjusted width measurement or perform structural adjustments before installation.
- Level: Place your level horizontally along the sill and the head. If the bubble isn’t centered, the opening is sloping.
- Plumb: Place your level vertically against both the left and right side jambs. If the bubble is off-center, the walls are leaning.
If your window opening is slightly out of square but within the 1/4-inch tolerance, the installer can typically shim the new window to make it perfectly level and plumb. However, if the opening is badly warped, you will need to repair the rough framing first. Read our resources on Measuring Up: How to Get Perfect Window Dimensions Every Time and Measure Twice, Order Once: Your Guide to Perfect Replacement Window Sizing for help troubleshooting warped frames.
Measuring Different Window Styles and Organizing Your Data
Organization is your best friend during a window replacement project. If you are replacing multiple windows across your home, writing down a random list of numbers on a scrap piece of wood is a recipe for disaster.
We highly recommend creating a structured window tracking worksheet. For every window, record:
- Location/Room Name (e.g., “Kitchen Left”, “Master Bedroom South”)
- Window Style (e.g., Double-Hung, Slider, Casement)
- Width (all three measurements, with the smallest highlighted)
- Height (all three measurements, with the smallest highlighted)
- Depth
- Squareness (both diagonal numbers)
This level of detail helps us determine the Best Windows for Your Utah Home based on the specific architectural demands of each room.
How to Measure a Windows for Replacement by Style
Different window styles operate differently, which means they have unique structural frames. Here is how to adapt your measuring technique for various styles:
- Double-Hung and Single-Hung: Measure from the jamb surface where the sashes slide. Ensure you do not include the sash tracks or weatherstripping in your width and height.
- Casement and Awning: These windows crank outward. Open the window fully to measure the inside frame from jamb to jamb and head to sill.
- Sliding (Glider) Windows: Similar to double-hung windows, measure inside the tracks from side to side and top to bottom, keeping your tape measure straight.
- Bay and Bow Windows: These consist of multiple window panels angled outward. You must measure the width and height of each individual panel separately, rather than trying to measure across the entire curved opening in one go. For specialized help with these architectural features, check out Curvy Windows: Perfect Fit – Measuring for Bay and Bow Replacements.
- Picture (Fixed) Windows: Because these do not open, measure from the innermost edge of the frame profile holding the glass.
How to Measure a Windows for Replacement from the Inside vs. Outside
For standard insert vinyl or wood replacement windows, you should almost always measure from the inside of your home. Measuring from the inside is safer, easier, and gives you direct access to the finished jambs and stops.
However, there are times when you must measure from the outside:
- Brick Homes: If you live in a brick home, the exterior brick opening (brick-to-brick) dictates the absolute maximum size of the window frame. Measuring the exterior opening ensures the new window trim will interface correctly with your masonry.
- Full-Frame Replacements: If you are removing the entire existing frame down to the studs, measuring the exterior trim and siding interface helps determine the rough opening size.
If your home features classic brickwork, make sure to read Don’t Get Bricked Up: How to Accurately Measure Windows in a Brick House to avoid common masonry pitfalls.
Frequently Asked Questions about Window Measurements
Should I measure each window individually even if they look identical?
Yes, absolutely. Even if two windows in your living room look identical, you must measure each one individually. Houses settle unevenly. A window on the east side of your home might have settled slightly differently than one on the west side.
Assuming all your windows are the same standard size is one of the quickest ways to end up with custom-ordered frames that are too large or too small for half of your openings. If you are replacing sashes or frames, keep your measurements distinct, as detailed in Don’t Get Sashed: Your Guide to Measuring for Replacement Window Sashes.
What are the most common window measuring mistakes to avoid?
Over the years, we have seen homeowners make the same few mistakes that lead to drafty windows or expensive return fees. Here is a quick reference table comparing correct and incorrect measuring practices:
| Correct Practice | Incorrect Practice | Why It Matters |
|---|---|---|
| Measuring inside the frame (jamb-to-jamb) | Measuring the decorative trim or casing | Trim is decorative; measuring it results in a window that is far too large. |
| Recording the smallest of three measurements | Recording the largest measurement or an average | The window must fit into the tightest spot of the opening. |
| Rounding down to the nearest 1/8 inch | Rounding up to the nearest inch | A window that is slightly too small can be shimmed; a window too large won’t fit at all. |
| Measuring the opening depth | Assuming standard wall depth is sufficient | Standard replacements require at least 3-1/4 inches of clear depth. |
| Checking diagonals for squareness | Assuming the opening is a perfect rectangle | Out-of-square openings require adjusted sizing or structural repairs. |
Should I measure myself or have a professional confirm the dimensions?
Taking your own measurements is a fantastic way to get ballpark quotes and begin planning your budget. It allows you to explore styles and compare options without any pressure.
However, because custom-ordered windows are non-refundable, we always recommend having a professional window installer confirm the final measurements before placing your order.
When we handle the measurements, we assume full liability for the fit. If a window doesn’t fit, it’s on us to correct it—giving you complete peace of mind. For tips on choosing the right team for the job, see Don’t Get Paned: How to Find the Best Window Installation Near Me.
Conclusion
Accurate measurements are the foundation of a successful window replacement project. They ensure your new windows fit snugly, eliminate drafts, prevent water intrusion, and maximize your home’s energy efficiency. Heat gain and loss through windows account for 25% to 30% of residential heating and cooling energy use, making a precise fit one of the best investments you can make for your home’s comfort and your wallet.
At M&M Gutters & Exteriors, we have been serving Salt Lake City, Salt Lake County, Utah County, Summit County, Tooele County, Davis County, and Weber County for over 30 years. We offer a true one-stop solution for all your exterior needs. To make the process even easier, we utilize advanced HOVER 3D visualization technology, allowing you to see exactly how different window styles and frame colors will look on your home before we install them.
Ready to upgrade your home’s comfort and curb appeal? Let us handle the tape measure. Visit our Windows service page today to explore your options or request a professional consultation. We’ll make sure your new windows are a perfect fit—the first time!