


Why Getting Your Bay Window Measurements Right Matters Before You Order
If you need to know how to measure a bay window for replacement, here’s the quick answer:
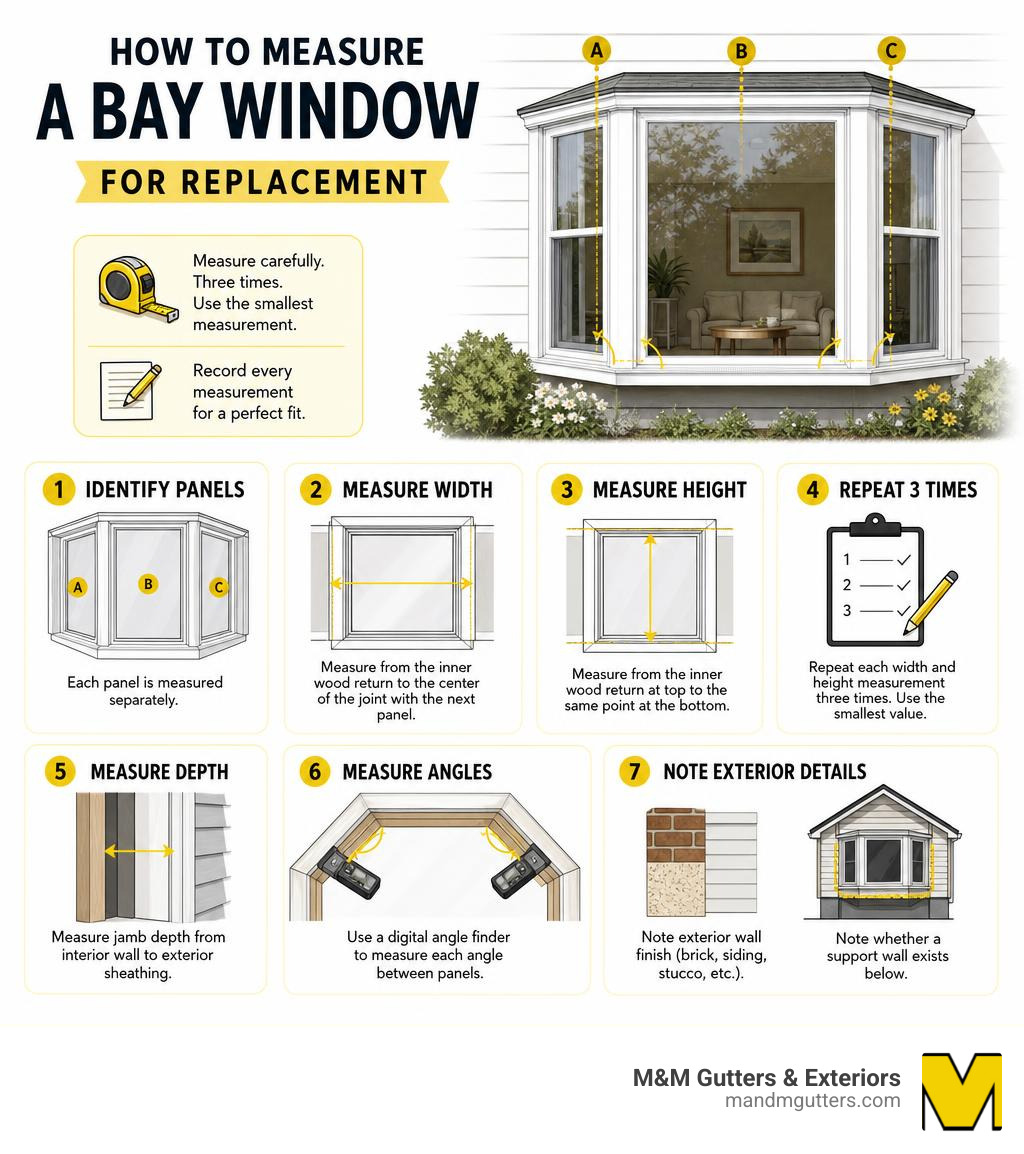
- Measure each panel separately — flankers (side windows) and center panel are different widths
- Width: Measure from the inner wood return to the center of the joint with the next panel
- Height: Measure from the inner wood return at top to the same point at the bottom
- Repeat each measurement three times — use the smallest value for each
- Measure depth (jamb depth) from interior wall to exterior sheathing
- Measure the angles between panels using a digital angle finder
- Note your exterior wall finish (brick, vinyl siding, stucco) and whether a support wall exists below
Bay windows are one of the most striking features a home can have. They push outward from the wall, pull in light from multiple angles, and create that cozy interior nook homeowners love. But when it’s time to replace one, that beautiful curved shape becomes a real measuring challenge.
Unlike a standard flat window — where you measure one rectangle and move on — a bay window is several windows joined at angles, projecting away from your home’s exterior wall. Miss a measurement, and your replacement unit won’t fit. And with bay window replacements typically costing $2,000 to over $6,000, an ordering mistake is an expensive one.
I’m Nathan Nuttall from M&M Gutters & Exteriors, and over 30+ years serving Utah homeowners, our team has helped hundreds of people navigate exactly this process — from figuring out how to measure a bay window for replacement on older Salt Lake City homes to handling tricky support wall configurations. We’ll walk you through everything you need to get it right the first time.
How to measure bay window for replacement vocabulary:
- how do you measure a replacement window
- how to measure for replacement windows in a brick home
- how to measure house windows for replacement
Understanding Bay vs. Bow Windows and Pre-Measurement Prep
Before you pull out your tape measure, we need to clarify exactly what kind of projection window you have. While people often use the terms interchangeably, bay and bow windows are structurally distinct, and this directly impacts how you measure them.
A bay window typically consists of three panels: a large, fixed center window flanked by two smaller angled windows (called “flankers” or “side lites”) that usually open for ventilation. These side panels are set at sharp, distinct angles—most commonly 30 or 45 degrees—creating a boxy, geometric alcove.
A bow window, on the other hand, uses four, five, or six panels of equal size to create a gentle, sweeping curve. Because bow windows have more sections and milder angles (often around 10 degrees), measuring them requires mapping out a larger number of identical facets. If you’re deciding which style best fits your home’s architecture, check out our guide on Different Window Styles for Your Home.
To understand the energy and structural technologies behind these projecting units, you can also explore the Window Types and Technologies | Energy.gov resource.
Essential Tools for the Job
Measuring a projecting window is not a one-person job with a flimsy sewing tape. To get precise, professional-grade numbers, you will need:
- A heavy-duty steel tape measure: Avoid fabric tapes, which sag and stretch, throwing off your numbers.
- A digital angle finder (1 foot or longer): This is crucial for identifying the precise mullion angles.
- A sturdy step stool or ladder: For reaching the upper frame.
- A notepad, pencil, and camera (or smartphone): You will want to sketch the layout and take reference photos.
- Cardboard and scissors: For a clever trick we will show you later to prevent overlap.
- A 24-inch level: To check if your existing opening has settled or gone out of square.
Safety and Preparation Checklist
Because bay windows protrude from the home, they are subject to unique structural stresses. Before you start measuring, inspect the window for signs of structural sagging or wood rot. If the window frame is warped, it may be because the cantilevered seat board is sagging.
If you suspect structural damage, do not attempt to force the window components or remove trim without proper bracing. Always have a partner hold the other end of the tape measure, especially when working on ladders or measuring the exterior projection.
Step-by-Step Guide: How to Measure Bay Window for Replacement
To get a perfect fit, we must look past the decorative trim and measure the actual window frame. Houses settle over time, and wood frames can warp due to Northern Utah’s dramatic freeze-thaw cycles. This means your opening is rarely a perfect rectangle.
When figuring out how to measure a bay window for replacement, the golden rule is to measure in three different spots for every single dimension (top, middle, bottom for width; left, center, right for height) and record the smallest number. For a deep dive into general sizing principles, read our guide on Measuring Up: How to Get Perfect Window Dimensions Every Time.
How to Measure Bay Window for Replacement: Width and Height of Panels
Because a bay window is a multi-panel system, you cannot simply measure the entire opening from one far wall to the other and call it a day. You must measure each individual panel—the left flanker, the center panel, and the right flanker—separately.
- Locate the Inner Wood Return: Open your window or look closely at the interior frame. You want to measure from the inner wood return (where the window frame meets the interior casing trim) rather than the decorative molding itself.
- Measure the Flanker Widths: Extend your steel tape measure from the inner wood return of the left-hand outer frame to the exact center of the joint (mullion) where the left window meets the center window. Write down this number. Repeat this at the top, middle, and bottom of the panel, recording the smallest value. Repeat the exact same process for the right flanker.
- Measure the Center Panel Width: Measure the space between the middle of the left joint and the middle of the right joint. Because center panels are typically much wider than the side flankers, do not assume they match. Measure this at three vertical heights as well.
- Measure the Panel Heights: For each of the three panels, measure the vertical distance from the inner wood return at the top of the frame to the inner wood return at the bottom. Do this on the left side, center, and right side of each individual panel.
For more tips on choosing the right replacement size without getting overwhelmed, consult our handbook on Measure Twice, Order Once: Your Guide to Perfect Replacement Window Sizing.
How to Measure Bay Window for Replacement: Angles and Projection
The angles where your window panels meet are called mullion angles. While standard manufacturer configurations usually come in 10-degree (mostly for bows), 30-degree, or 45-degree angles, older homes along the Wasatch Front often have settled walls or custom-built angles that do not fit standard molds.
To measure these angles accurately:
- Place a digital angle finder flat against the glass or inside frame of the left flanker, then extend the arm to rest flat against the center window.
- Note the angle. If you do not have a digital angle finder, you can measure the outside angle and subtract it from 180 degrees to find your unit angle.
- To learn more about general window geometry and rough openings, you can read the How to Measure for Replacement Windows | Family Handyman guide.
The Cardboard Placeholder Technique
To prevent the headrails or window frames from knocking into each other at the corners (especially if you plan to install blinds or custom casing), use the cardboard placeholder technique:
- Cut out two square pieces of cardboard that match the depth of your new window frame (or the minimum flush mount depth of your planned window treatments).
- Place these pieces of cardboard in the adjoining inside corners where the flanker meets the center window.
- Slide them until their front edges meet. Mark this intersection point lightly with a pencil.
- Measure the width of the center window between these pencil marks. This ensures your new frames will have enough clearance to sit side-by-side without colliding.
Measuring Support Walls, Headboards, and Seatboards
Unlike flat windows, bay windows are heavy, cantilevered structures that project 12 to 24 inches out from your home’s exterior wall. This means they require robust support.
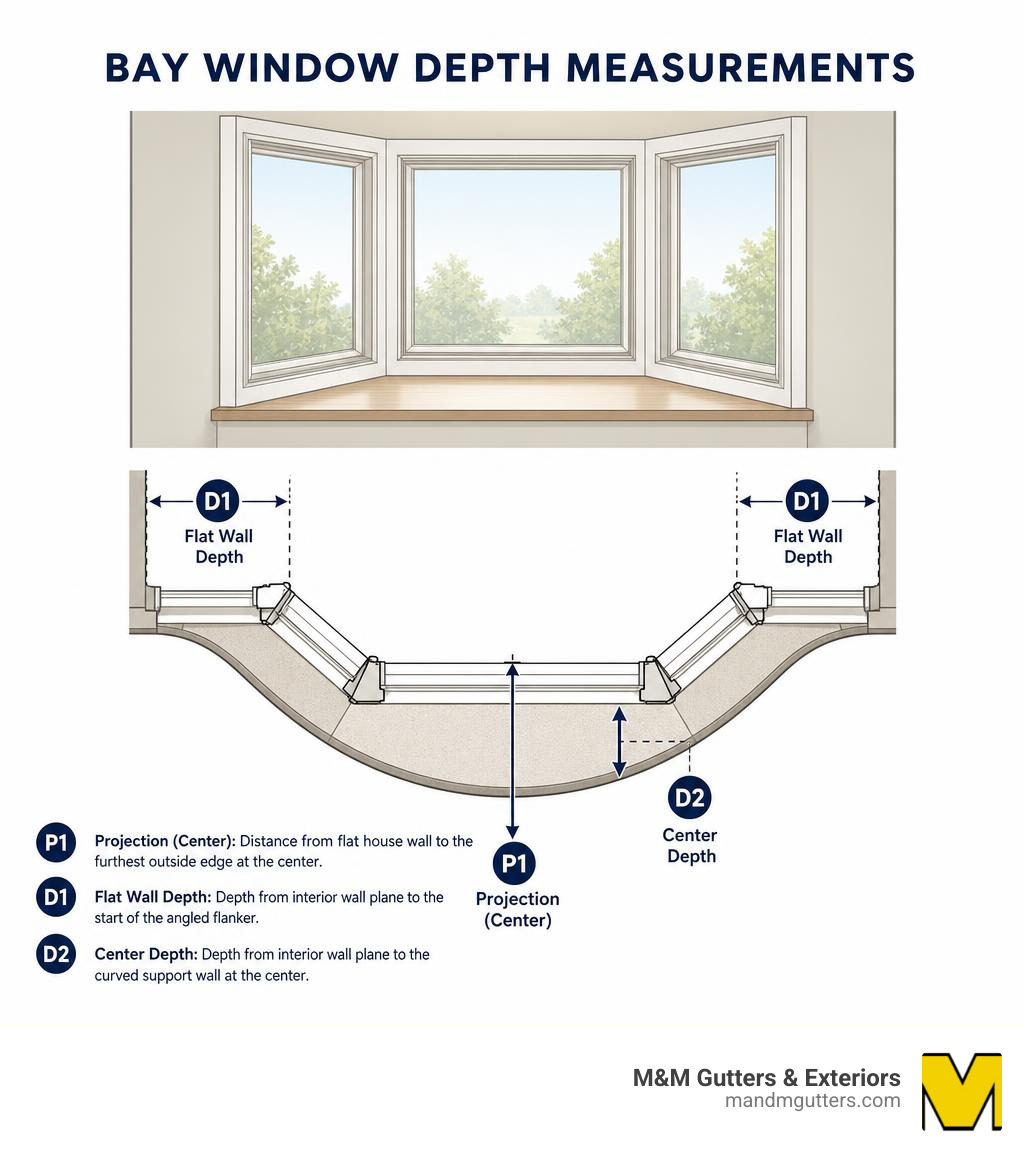
If your bay window sits on a protruding support wall, you must determine if that wall is segmented (flat sections built at sharp angles) or curved (a smooth, rounded masonry or wood ledge).
To measure for a curved or angled support wall, you need three critical depth measurements:
- Projection (P1): The straight-line distance from the exterior sheathing of your flat house wall to the furthest outside edge of the window frame at the center.
- Flat Wall Depth (D1): The depth of the window seat from the interior wall plane to the point where the angled flanker begins.
- Center Depth (D2): The total depth from the interior drywall plane to the inside of the center window pane.
Headboards and Seatboards
The headboard (the ceiling of the bay nook) and the seatboard (the ledge you sit on) act as the structural “sandwich” holding the window panels together. When measuring the flat wall depth for these boards, measure from the interior drywall face to the exterior sheathing.
If there is no support wall underneath the window, the entire unit must be suspended using cable supports. These heavy-duty steel cables attach to your home’s overhead framing studs, running down through the window’s vertical mullions to hold the seatboard level. If your existing window is sagging or lacks a support wall, you must note this so your replacement order includes a cable support kit.
Advanced Sizing: Brickmould, Rough Openings, and Wall Finishes

When ordering a replacement bay window, you will need to choose between measuring the outside brickmould (BM) size or the inside frame size.
The brickmould is the exterior wood or vinyl trim that frames the window against your siding or brick. Measuring the outside brickmould is highly preferred if you want to preserve your existing exterior wall finish without tearing up siding. However, if you are doing a full-frame replacement where the entire unit is stripped down to the studs, you must measure the rough opening (RO).
The rough opening is the raw, unfinished wooden frame in your wall. To find this, you must remove the interior trim casing to expose the jack studs and header. Standard manufacturer specifications (like Marvin or Pella) dictate how much smaller the window unit must be than the RO to allow for shimming, insulation, and leveling. For instance, replacement units are typically fabricated 1 inch smaller than the RO width and 1/2 inch smaller than the RO height.
If you are dealing with a brick exterior, you must account for the masonry opening. Brick opening sizes typically require deducting 1/2 inch total (1/4 inch per side) from the overall size provided to allow the window to slide into place. For specific instructions on brick homes, read our specialized guide: Don’t Get Bricked Up: How to Accurately Measure Windows in a Brick House.
Wall Finishes and Sizing Adjustments
Your home’s exterior finish plays a massive role in how we size and install your replacement window:
- Stucco (Hard Coat or EIFS): In Salt Lake City, stucco is incredibly common. Because stucco is rigid and prone to cracking, we must measure with extreme care to avoid disturbing the surrounding stucco seal.
- Vinyl Siding: Vinyl siding offers more flexibility, but we must measure the J-channel trim width to ensure the new brickmould integrates seamlessly.
- Brick/Stone Ledges: If your bay window rests on a stone or brick ledge, we must measure the height from the highest point of the masonry sill to the underside of the header, ensuring a slight slope remains for water runoff.
| Measurement Type | What It Measures | When to Use It | Standard Deductions / Offsets |
|---|---|---|---|
| Rough Opening (RO) | Raw wood-to-wood framing (stud to stud) | Full-frame replacements, major remodeling | Fabricated 1″ narrower and 1/2″ shorter than RO |
| Inside Frame Size | Inner wood return to inner wood return | Pocket or insert window replacements | Sized to fit exactly inside existing jambs |
| Outside Brickmould (BM) | Outer edge of exterior trim to outer edge | Preserving existing siding, stucco, or brick | Deduct 1/2″ total for brick openings |
Frequently Asked Questions about Bay Window Sizing
What is the difference between measuring a bay window and a standard flat window?
A standard flat window is a single, two-dimensional plane requiring only a basic width, height, and depth measurement. A bay window is a three-dimensional projection. To measure it, you must treat it as three separate windows, calculating individual panel widths, the projection depth from the house, and the specific angles (usually 30 or 45 degrees) at which the panels meet.
What should I do if my existing bay window angles are non-standard?
If your digital angle finder reveals that your window angles are unusual (for example, 38 degrees instead of a standard 45), you have a few options. Many premium manufacturers offer custom-angle mullions, though these come with a higher price tag. Alternatively, we can adjust the individual unit widths, use tapered framing blocks to bridge the gap, or install separate rectangular windows framed with custom exterior trim to mimic the bay look.
Why is measuring from the inner wood return so critical?
Measuring from the decorative interior casing or the exterior trim instead of the inner wood return is the number one cause of ordering errors. Decorative trim can vary wildly in thickness and placement. Measuring from the inner wood return ensures you are measuring the actual structural frame of the window, guaranteeing that the new unit will slide perfectly into the existing pocket.
Conclusion
Measuring a bay window for replacement is a detailed, precise process. Because these beautiful fixtures project out from your home, they require absolute accuracy to maintain their structural integrity and weatherproofing. A single miscalculation can lead to drafts, water leaks, or a window unit that simply will not fit into your wall.
That is why we always recommend taking detailed interior and exterior photos of your existing window to submit with your measurements. Better yet, let a professional handle the final verification.
At M&M Gutters & Exteriors, we have over 30 years of experience serving homeowners across Salt Lake County, Utah County, Davis County, and Northern Utah. We don’t believe in guesswork. That is why we use advanced HOVER 3D visualization technology to map your home’s exterior with millimeter precision before we ever place an order.
If you are ready to upgrade your home’s curb appeal and energy efficiency with a gorgeous, perfectly fitted bay window, we are here to help. Explore our Services – Windows page today, or contact our Salt Lake City team to schedule your free professional measurement and consultation!